Maven is a software project management and comprehension tool that includes: build tools, dependency management, project reporting and much more. I say “much more” because at the core Maven is a plugin execution framework. There are plugins supported by the Maven project (http://maven.apache.org/plugins/index.html), plugins supported by Mojo Project (http://mojo.codehaus.org/plugins.html), and third party plugins. If you can find or write a plugin, Maven can run it.
People always gravitate to this question of whether Maven is better than Ant and Ivy. Unfortunately this is not a fare comparison. Ant is a build tool and Ivy is a dependency management tool. Maven is not just a build tool or just a dependency management tool. On the contrary, Maven is a project management tool that embodies software development best practices.
To illustrate this point I will share a story from my early years in software development. Our shop used Ant without Ivy. Ivy didn’t become a full fledged Apache project until October, 2007. Each team had their own Ant build. As we began to move from team to team we had to find out which targets needed to be run. Over time we decided on a set of names that every team needed to implement. This helped but just because the target was named the same thing it did not mean they worked the same way.
Long story short, we began to meet to create a shared standard. During this long process we were introduced to Maven. Ironically, Maven had accepted standards for many of the issues that we were trying address. Maven was not just a standard for our company it was a standard for all Maven users. New employees that were familiar with Maven had a good grasp of how we managed our projects.
Maven provided a standard that not only addressed our concerns as software developers. It provided a standard solution that supported our corporate: audits, disaster recovery, tracability, and the list goes on. We were trying to reinvent the wheel with Ant when the Maven community had already solved these problems.
Ant and Ivy are powerful ingredients for designing a custom build process. Maven however is a powerful solution for building and managing software. In our case we wanted a solution instead of the ingredients and tools to create our own solution. Maven satisfied our needs and saved us significant time and money.
But It Downloads the Internet
I can’t tell you how many people have told me that they don’t like Maven because it “downloads the internet”. I find it ironic that many of them like Ivy. I hate to break the news, but Ivy downloads the internet too. I’m not sure why this is a concern. Is there a fear that Maven will fill up their hard drive? Disk space is cheap. The computer I am working on right now has 150GB of hard disk space and my Maven local repository is eating up 300MB of it. This computer has pleanty of room for more of the internet.
I recall the first time that I tried to setup a new project without a dependency management tool. I spent over a week trying to download the correct version of each JAR. I was ready to take a vacation by the time I finished this ugly puzzle. After using Maven and Ivy for managing my dependencies I will never go back. By the time I downloaded all the JARs that we needed, I felt like I had in fact downloaded the entire internet.
I love dependency management tools and they can have as much of my hard drive as they need.
Getting Started
The new stable version Maven 3.0.3 was released March 3rd of this year. This tutorial will demonstrate how to setup and run this newest version. The only system requirements for Maven are JDK 1.5 or above and an internet connection.
Unzip the contents in your root Maven folder. In my case I unzipped it in C:/java/maven.
Setup M2_HOME in your environment variables and point it to your installation directory. In my case this is C:/java/maven/apache-maven-3.0.3. (Note: You need to use M2_HOME instead of M3_HOME because the maven plugin for eclipse will not work with M3_HOME.)
Add ‘%M2_HOME%/bin’ to your PATH variable.
Open a command window and run the ‘mvn -version’ command.
You should see version information about Maven 3.0.3.
What is a POM?
POM stands for “Project Object Model”. This XML file stores information about your project.
Project Information
Basic information about the project including version, artifcat type, dependencies, properties, etc.
Build Settings allow you to declare custom directory structures, configure custom plugin steps, and project reporting.
Project Information includes: license, organization, developers, and contributors.
Environment Settings allow you to configure locations for issue management, continuous itegration, mailing lists, versin control, Maven repositories, and download urls.
If you really hate XML there are a few options. One option that has been around for a while is to use an IDE that provides tooling for Maven configuration. In my experience these are very helpful but advanced configurations will still need to be added by hand. Maven 3 breaks this wide open by introducing configuration alternatives in Groovy, Scala, Clojure, and JRuby (http://polyglot.sonatype.org/index.html). If you have an existing Maven 3 project that you want to switch from XML to a JVM language there is a translate command http://polyglot.sonatype.org/porting-languages.html.
Convention over Configuration
Maven uses project information from the pom.xml file to manage the project. The package type (pom, jar, maven-plugin, ejb, war, ear, rar, par) determines which actions are applied to your project by convention. These standard actions can be modified in the build secion of the POM. This is one of the primary reasons that comparing Ant and Maven is like comparing apples and oranges. Every action or task in Ant has to be explicitly declared for each project. While Ant allows you to extract common tasks to be reused they do not provide an industry standard. Ant is not a project management tool. Ant merely provides the building blocks for you to create your own project management infrastructure. Maven decided that all projects should be treated the same by default. Maven hits the ground running. Ant gives you the tools to begin running.
Maven conventions include:
Standard package structures
Standard output directories
Standard artifact structure and naming
Standard build steps and order
Standard 3rd party dependency repository locations
Standard Release process
Standard artifact publishing
These standards are best practices within our industry. Nevertheless, all of these defaults are easily extended and modified. Maven provides a simple way to focus on developing software instead of focusing on project management.
New Project
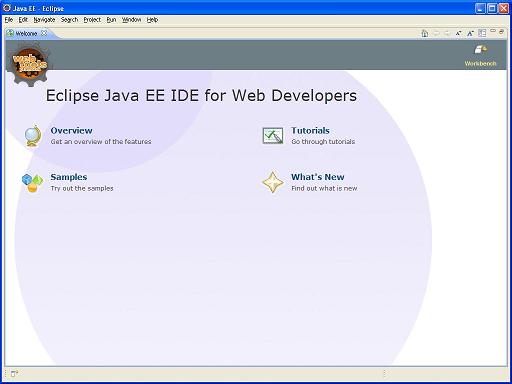
For this example I will be using Eclipse for my IDE.
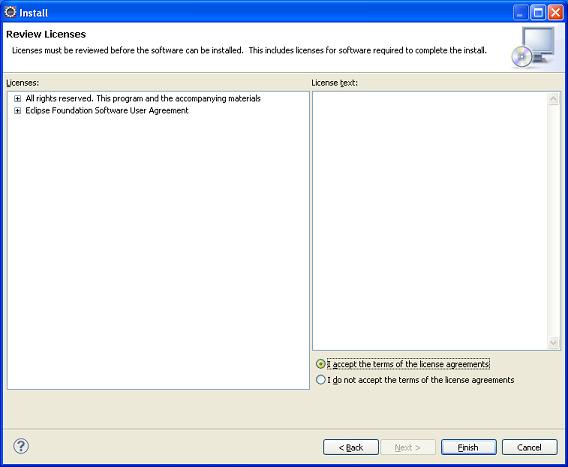
Select ‘I accept the terms of the license agreements’
Click ‘Finish’
Click ‘Restart Now’
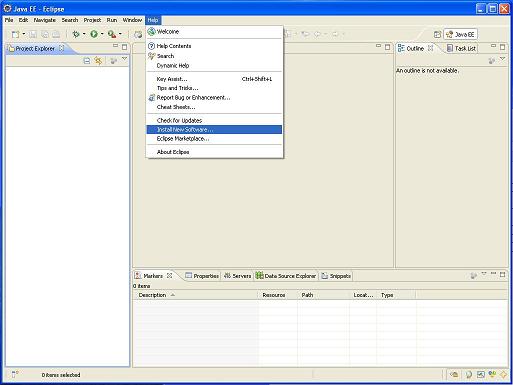
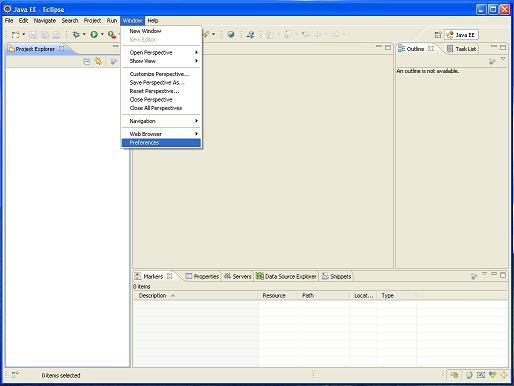
Select Window -> Preferences
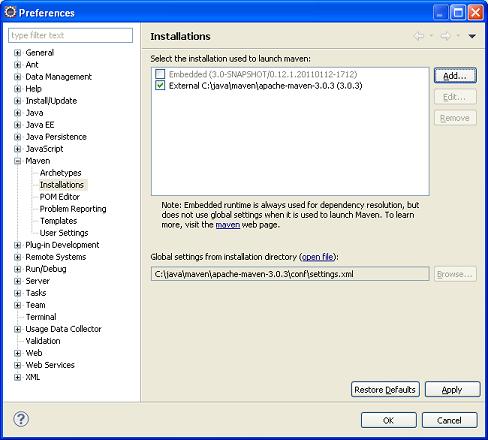
Add the Maven 3 location the you installed earlier
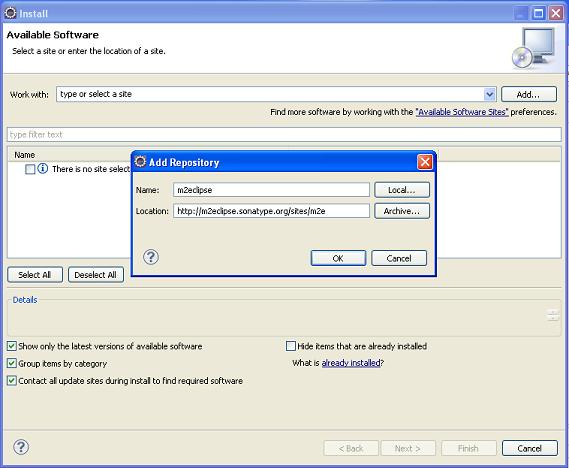
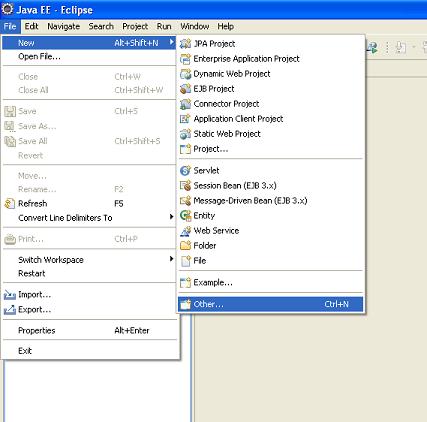
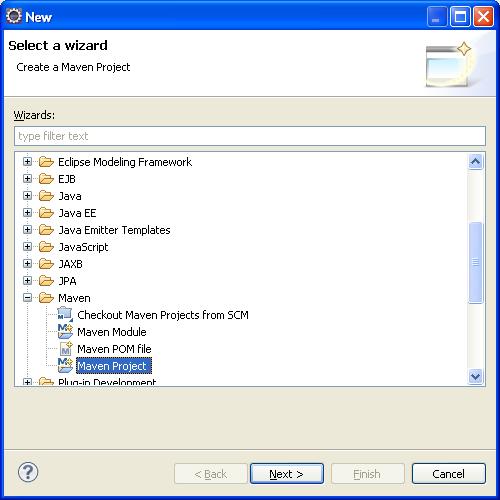
Create a new Maven project by selecting File -> New -> Other...
>
Select Maven -> Maven Project
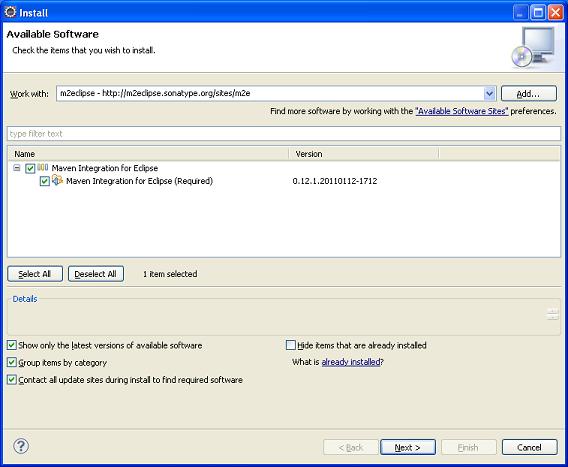
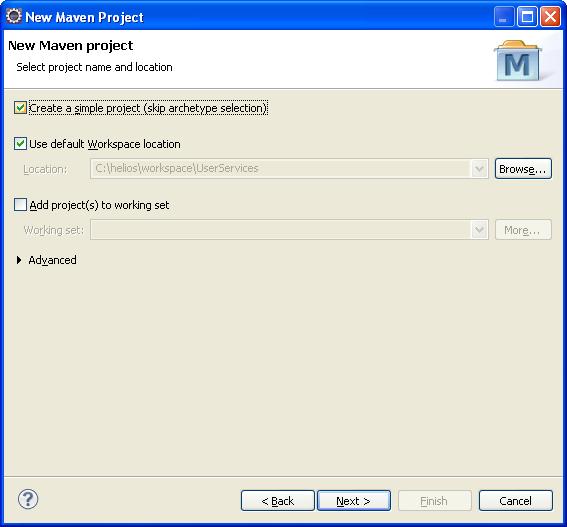
Check ‘Create a simple project (skip archetype selection)’
Click ‘Next >’
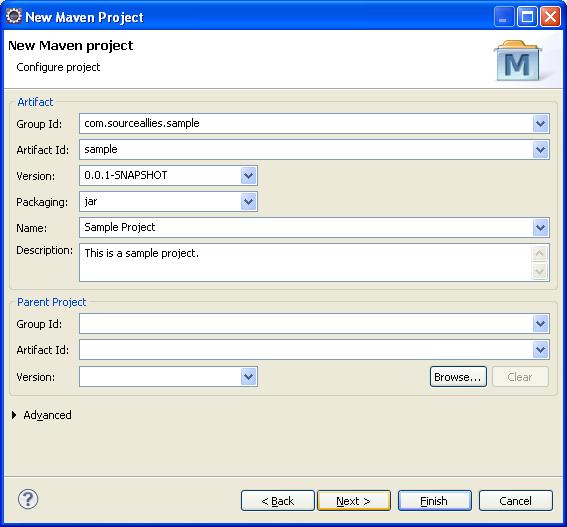
Enter Project Information
Enter Group Id. This is the domain where the project is hosted. For example if the ‘Awesome’ project was hosted at GitHub then the Group Id would be ‘com.github.awesome’.
Enter Artifact Id. This is the name of the resulting artifact. For example if Artifact Id is ‘awesome’ and the packaging is JAR the artifact will be named ‘awesome.jar’.
The version can remain 0.0.1-SNAPSHOT
Select the packaging that you desire
Enter a Name. This name will show up in the console when you run Maven. This will also show up in the documentation that Maven generates
Enter a Description. This is used in the documentation
Click ‘Next >’
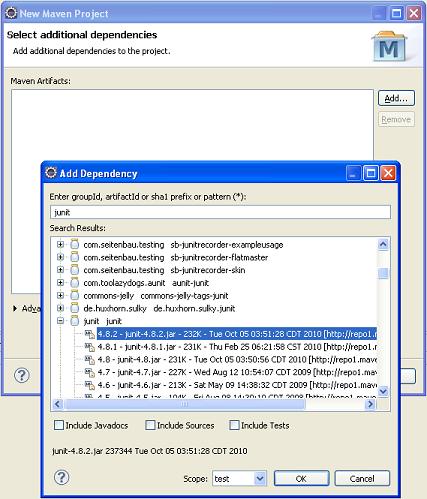
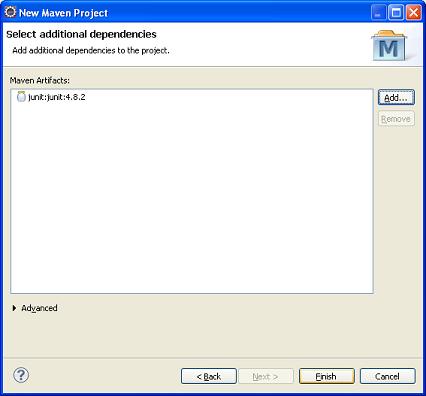
Add a dependency on JUnit. One of the best features of m2eclipse plugin is the ability to search for available dependencies. (This feature does not work if you configure ‘M3_HOME’ instead of ‘M2_HOME’)
Click ‘Finish’
src - source and resource files
target - compiled files, reports and generated artifacts
main - application/library files
test - test files
java - java files
resources - non java files like XML
Maven’s default package structure:
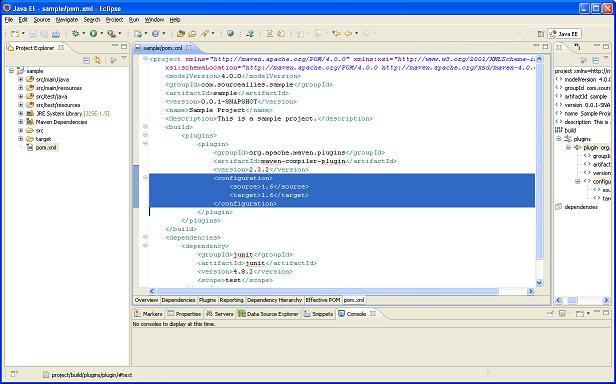
Open the pom.xml file.
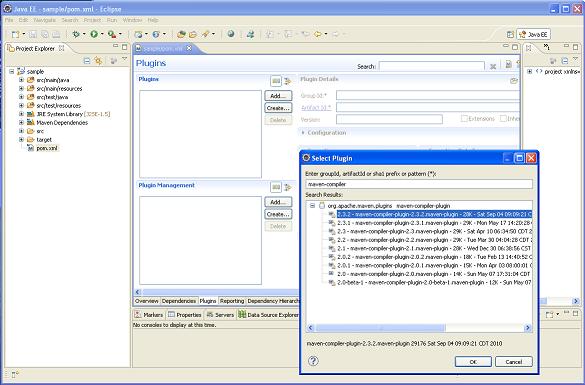
Add the compiler plugin so you can configure your JDK version. Search for the maven-compiler-plugin.
For this example set the JDK version to 1.6
	1.6</source>
	1.6
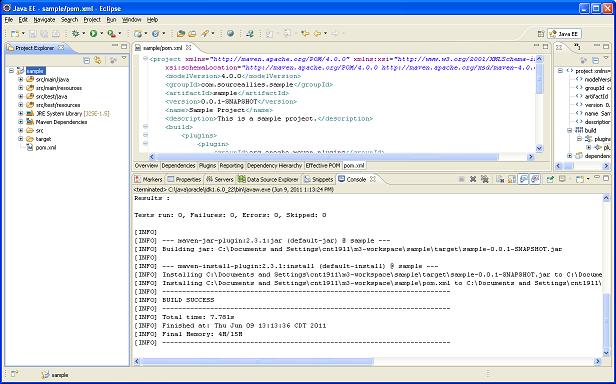
Run ‘Maven install’ to verify that the project and environment is setup correctly
The build was successful
Project Management
Parent POM
Parent POMs are an simple way to extract common configurations and reuse them in multiple projects. We will extract the compiler plugin configuration into a parent pom.
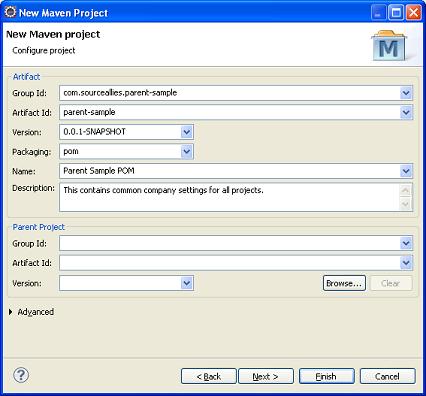
Create a new Maven Project with a packaging type of ‘pom’.
<project xmlns=”http://maven.apache.org/POM/4.0.0” xmlns:xsi=”http://www.w3.org/2001/XMLSchema-instance” xsi:schemaLocation=”http://maven.apache.org/POM/4.0.0 http://maven.apache.org/xsd/maven-4.0.0.xsd”> <modelVersion>4.0.0</modelVersion>
<groupId>com.sourceallies.parent-sample</groupId>
<artifactId>parent-sample</artifactId>
<version>0.0.1-SNAPSHOT</version>
<packaging>pom</packaging>
<name>Parent Sample POM</name>
<description>This contains common company settings for all projects.</description>
<build>
	<plugins>
		<plugin>
			<groupId>org.apache.maven.plugins</groupId>
      <artifactId>maven-compiler-plugin</artifactId>
			<version>2.3.2</version>
			<configuration>
				<source>1.6</source>
				<target>1.6</target>
			</configuration>
		</plugin>
	</plugins>
</build>
</project>
Note: Update the project configuration after you change the Java version. Right click your project -> Maven -> Update Project Configuration
Local Maven Repository
It’s a good idea for organizations to host their own local Maven repository. This provides more control over the hosting and management of project dependencies. This also provides a place to easily add third-party artifacts that may not be available in external Maven repositories.
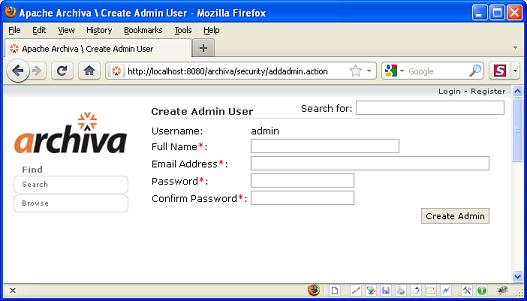
I’m most familiar with Archiva so I will set it up in this tutorial. Nevertheless, there are other Build Artifact Repository Management software available such as Sonatype.
For this example I am going to follow the steps outlined in the<a href=”https://web.archive.org/web/20110617034307/http://archiva.apache.org/docs/1.3.5/quick-start.html”> Archiva Quick Start</a> guide.
Download and unzip Archiva
Open a Commandline window
Navigate to the ‘bin’ directory in the exploded Archiva directory
Run ‘archiva.bat console’
Setup a new Admin account
Add this repository to the ‘settings.xml’ file in [Maven 3 Home]/conf. This sets Archiva as your dependency repository. Add this to the ‘mirrors’ section.
To publish your artifacts to Archiva add the following to the ‘settings.xml’ file. Replace archiva-deployment-user with the Admin username (this is ‘admin’ by default) that you setup. Replace archiva-deployment-pwd withthe Admin password that you setup.
Since the ‘distributionManagement’ information was modified you need to first run ‘mvn clean install’ on the ‘parent-example’ project. Then run ‘mvn clean deploy’ on the ‘example’ project. This will download the dependencies to the local Archiva dependency repository and publish the ‘example.jar’ to Archiva.
Maven restricts projects to one artifact per ‘pom’ file. While we can argue whether this is the right approach, there is a simple solution. If you have a project called ‘sample-service’ that produces a WAR and you want to create a JAR from the same source code then you need to create a second package containing a single pom file.
The ‘sample-client’ pom is configured to point to ‘sample-service’ for it’s source files. This should be added to the ‘build-helper-maven-plugin’ configuration. Please refer to http://mojo.codehaus.org/build-helper-maven-plugin/usage.html for more information.
This is a very powerful plugin. If you’ve ever released a project by hand you will appreciate this plugin. One of my favorite features is that it checks to see if all of the dependencies refer to released versions. Without this automatic check you are forced to search through all of the dependency management configurations for unreleased dependencies. Depending on the size of your hierarchy this can be quite painful.
Along with this dependency check it also runs all of the tests, tags the code with the release name, and publishes the artifacts in the Maven repository. This plugin embodies the best standards for releasing within our industry. Standards that I easily forget and/or mess up. I highly recommend that you use this plugin to release your projects. Please refer to https://maven.apache.org/maven-release/maven-release-plugin/ for more information.
When you execute a Maven command at the aggregate level it will execute the same command on all of the configured modules. If any of these modules depends on another module Maven builds them in the correct order. This is a simple way to break up a large project into focused modules without loosing a coordinated project management strategy. While this could be replicated with Ant and Ivy it would be painful to configure and maintain. Aggregate projects are first class citizens in Maven.
Dependency Management
The ‘dependencymanagement’ section defines the acceptable versions for a project. This configuration does not result in a JAR being downloaded and included in the project. On the other hand, this is a directive specifying which version of a dependency should be used if a project depends on it. This is a simple way to force Maven to select a specific dependency version. In the case of an aggregate project it is best to add this to the aggregate pom. Configure the dependency versions in one place for all of the modules.
Maven provides a simple way to package all of your artifacts in a single zip file. This simplifies the deployment process and increases traceability. For example I have used this feature to package my WAR, SQL, and external PDF files in the same zip file. Our deployment team extracted the WAR and PDF files and deployed them. Then they passed the SQL on to the DBA’s to run the scripts. All of the files necessary to deploy our project were packaged together and published to our Maven repository. Please refer to http://maven.apache.org/plugins/maven-assembly-plugin for more information.
Conclusions
Maven provides a holistic approach to project management. Maven provides standard conventions that can be easily modified and extended. When our development team switched from Ant/Ivy to Maven we spent less time focusing on how to build our projects. In the end Maven provided industry project management standards that we could depend on. Even when we spent hours trying to perfect our Ant build process we were getting some things wrong. We were focused on deploying the product at that moment. Unfortunately companies need to insure that deployments are traceable, dependable, and reproducible. Maven freed us up to focus on getting the product out while protecting our companies interests right out of the box.


 >
>
 Maven’s default package structure: